Changing File Codes
Written and published March 8, 2000
Over past two weeks Bill and I explained creator codes and file types. Now that you understand them, you're ready to try changing them. This week Bill Briggs gives you the gift of his AppleScript Code Changer applet. (We know there are other programs that can do this, but our focus is this free one made with plain vanilla AppleScript.)
If you'd like to follow along with this column, download Bill's AppleScript Code Changer applet now.
Discovering File Info
Of course, before you can change a code you need to know the codes of the file you're changing and of course know what code you'd like to change it to. To make that simple, Bill created the Get_Type&Creator_Codes applet (part of the CodeChanger package. Just drop any file onto this applet. For example, here's what it said when I dropped the CodeChange Read Me file onto it:
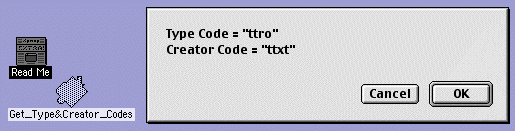
The top line, "Type Code = "ttro" tells us the file type. (TeachText Read Only) The bottom line, "Creator Code = "ttxt" tells us the code that identifies the application. (ttxt stands for TeachText or SimpleText.)
When you have a model file you'd like another file to emulate, drop the model onto this applet to learn about it, then note the codes.
Changing File Info
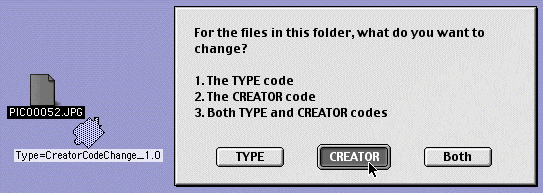
To actually change your file's code types, we give you Bill's Type=CreatorCodeChange_1.0. There are two ways you can use the code changer: by double-clicking or by drag and drop. If you double-click to open it, you then navigate to the desired folder full of files. We show you the drag and drop method here. Now lets get to work.
Singular File Changes
Last week, that I mentioned changing my Olympus digital camera jpgs into Photoshop. For starters lets do that together as an example. Remember this changes the creator, not the file type.
- Drop the Olympus jpg onto the Get applet and note its creator code, just in case. (TC01)
- Locate a file that's already a Photoshop jpg and drop it onto the Get applet. Write down its creator code. (8BIM in this case.
- Drop the Olympus jpg onto the Change applet.
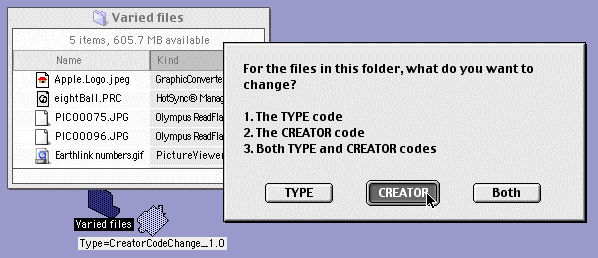
- Since we just want to change the Creator code, click creator. (It's the default button.)
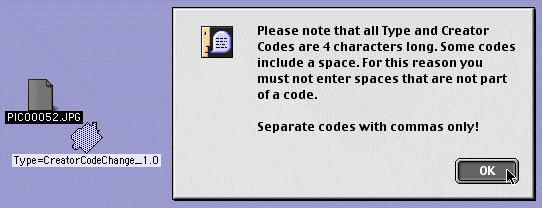
- Read the alert. (It mostly pertains to setting multiple files at once.) Then click OK.
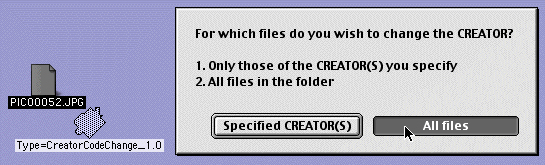
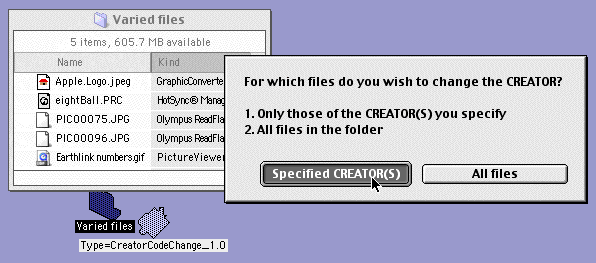
- Since we're changing only one file (the single file we dropped), click All files. (You'd also click All files when you have multiple files either loose or in a folder and want to change every one.)
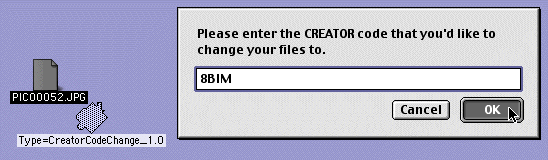
- Enter the Creator code of the application we want to have open this file. (Photoshop) This is the code we wrote down back in step 2.
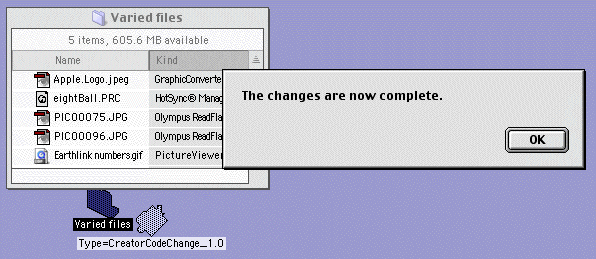
- 8. A dialog tells you when all files are converted. (Notice the icon on the file that changed.)
So that's how you change a single file. But I download 4 or 8MB of photos at a time. Changing one at a time wouldn't be efficient. To change multiple files:
- I could do the same things I did above, but instead of dropping one file I could open the folder full of files, do a Select all, then drag all of the files onto the Change applet at once, You can drag multiple files whether they are in a folder or lose on the desktop.
- Or, to be more efficient, we could just drag the entire folder onto the Change applet. Since all of the files in my folder are the same and all are to undergo the same change, the steps are the same as what we did above for a single file. This will change all designated files within the folder. It just won't see into any folders that are within that dropped folder. You can't drop a mixture of files and folders on it at the same time. That'll change the lose files but give you an error after that.
Selective Changes
What happens if you have a folder full of mixed documents? Rather than open the folder and Shift-click to select all of the files you do want to change (so you can drag them), you can drag the entire folder, When you do this, it's important to know the creator codes of the files you wish to be changing; not just in case something goes wrong, but in order to tell the app which files to change.
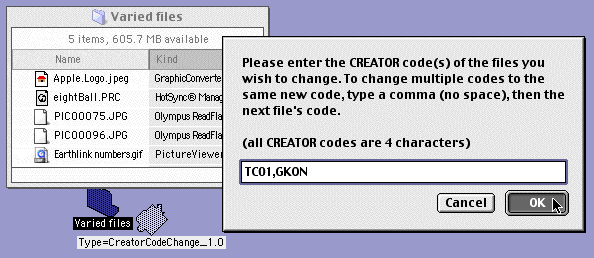
- 1. Drop the Olympus jpg onto the Get applet and note its creator code. You'll need this code in step 7. (In this case it'sTC01.)
- 2. Locate a file that's already a Photoshop jpg and drop it onto the Get applet. Write down its creator code so you can enter it later. (8BIM in this case.)
- 3. Drop the folder onto the Change applet.
- 4. Since we just want to change the Creator code, click creator. (It's the default button.)
- 5. Read the alert. (It mostly pertains to setting multiple files at once.) Then click OK.
- 6. Since we're changing files within a folder, click Specified Creators. (If we were changing file types we'd be clicking Specified File Types.
- 7. Enter the creator code of the files that you want to change. If you want to change more than one kind of file, type a comma after the first file's code, then enter the next code you wish the applet to effect. The applet will seek out those files. (In this case, we change Olympus and GraphicConverter jpgs, but not the Picture Viewer jpg.)
- 8. Enter the new creator code; the one you're changing to. This is the code we wrote down back in step 2.

- 9. A dialog tells you when all files are converted. (Notice the icon on the Olympus and GraphicConverter files change but the others are unaffected.)
That's all there is to changing a file's Creator code. Changing File Type codes work the same way. And when you choose Both to change both the Creator and File Type, you just enter both sets of codes. We figure you'll be able to take it from here. Used correctly these little applets can save you some time. We hope you'll enjoy whatever time you gain from them.
|